Are you looking for a convenient way of setting up Google Analytics 4 in WordPress?
One of the most powerful weapons you have as a WordPress site owner is analytics. You can use its data and patterns to make more informed decisions and help you understand your audience better.
As such, Google Analytics 4 is one of the best ways to gain data insight into site performance, user behavior, and traffic patterns.
In this ultimate guide, we’re going to detail everything you need to know about Google Analytics 4. We will walk you through how to set it up, configure it, and connect it to your site.
What is Google Analytics 4?
Google Analytics 4 (popularly known as GA-4) is the latest version of Google’s analytics platform. It is an upgraded version of Universal Analytics that we’re all familiar with.
The biggest reason for the evolution of Universal Analytics to Google Analytics 4 is how users interact with sites today.
UA primarily tracked user activity within a single session. This overlooked actions users took across multiple sessions, making it difficult to understand the complete user journey.
For example, a user would browse a product on their phone and then later on their laptop to complete the purchase. In this case, Universal Analytics would see this as two separate sessions, missing the connection and failing to attribute the conversion accurately.
Because of this, GA-4 introduces an event-based data model.
This latest version of Google Analytics captures user interactions as events instead of sessions. GA-4 events include things like page views, button clicks, and product purchases.
To make it even more effective, each event is timestamped and can be linked to a specific user ID, even if they occur across different sessions. This creates a more complete user journey that spans multiple sessions or devices.
To give you more context on how this metrics tool has changed, here’s a look at the new Google Analytics 4 Dashboard:
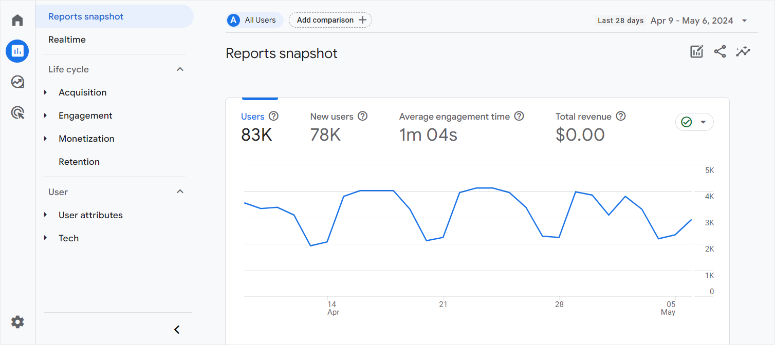
To add to this, GA4 comes with a ton of new features to track your website and get detailed insights into its performance which include:
- Privacy-focused measurement: With increasing concern around user privacy, GA4 offers features like improved data controls and cookieless measurement to help you comply with regulations and still gather valuable insights.
- Machine learning and AI: GA4 leverages machine learning to deliver smarter insights and automate tasks. This can include generating predictive reports and identifying user trends. Cross-platform tracking: Gone are the days of separate tracking for websites and apps. GA4 seamlessly gathers data from both sources, providing a unified view of the customer journey.
- Enhanced integrations: GA4 integrates more easily with other marketing platforms like Google Ads, allowing for more streamlined campaign management.
- Improved reporting: GA4 offers a revamped reporting suite with features like customizable dashboards and trended funnels for deeper analysis.
Ways to Integrate Google Analytics with WordPress
As a site owner, you should always have access to reliable and up-to-date data to run your site efficiently.
Each metric offered by Google Analytics 4 can be analyzed to help you understand your past and present data, allowing you to forecast your future site performance.
These metrics include:
- Number of site visits
- Where the visitors come from
- What they did do while on your site
- How long they stayed on your site
- How many pages did they visit
- What part of the page they stay on the longest
- Site speed analysis
- And so much more.
Other than these, here are additional and interesting ways you can use Google Analytics:
- Check how users switch between devices and platforms when interacting with your brand
- Check paths users take on your site and identify drop-off points
- Set up alerts to notify you of significant changes in your website’s metrics
As you can see, Google Analytics 4 offers a lot of data which can quickly become confusing even for seasoned users.
To add to this, Google Analytics is a standalone platform that can be hard to set up because it requires coding experience. You also need to add a tracking ID to your site code and carry out other processes to implement it fully.
A small mistake could lead to improper tracking or your site breaking.
That is why adding Google Analytics directly to your WordPress dashboard is more convenient and the perfect solution. It ensures that you collect all the information about your site from your website WordPress dashboard, never needing to leave your backend.
There are 3 main ways you can add Google Analytics to your WordPress site:
- Adding Google Analytics through MonsterInsights
- Adding Google Analytics through WPCode
- Adding Google Analytics through your WordPress theme
To make navigating this article simple, use the links above to skip to the method you want to use.
Now, adding Google Analytics through MonsterInsights and WPCode requires a plugin. These plugins are a quicker, more user-friendly approach that requires no coding experience.
On the other hand, adding Google Analytics to your site through your theme is a manual approach. Although it is a cost-effective solution, it requires coding experience, which can result in human error, code misplacement, or even the breakdown of your site.
We recommend using a plugin even if you have coding experience, as it can help you avoid data-tracking problems.
Adding Google Analytics through MonsterInsights
MonsterInsights is the best plugin to add Google Analytics to WordPress. It is an easy-to-use plugin that transforms complex data into actionable, practical, easy-to-understand insights.
Its advanced features can help you better track specific site aspects like click-through rates, conversion rates, and popular content. You can do all this without complex processes or coding experience. Plus, you do not need to go through extra steps like Google Tag Manager, Google Site Tag, and child themes.
It is by far the easiest way to handle the technical Google Analytics setup process without worrying about breaking your site or placing the tracking ID in the wrong location.
To add to this, MonsterInsights is a highly customizable plugin that lets you personalize the metrics you want from Google Analytics into an easy-to-understand structure and language.
For these reasons, MonsterInsights is the best way of adding Google Analytics to your site.
Check out our in-depth MonsterInsights review here.
Step 1: Sign Up for Google Analytics
Now, to get started with adding Google Analytics with MonsterInsights, you will need a Google account. If you do not have one, simply sign up for one. It’s free!
To do this, open the Google Analytics site and proceed to the Get Started Today button.

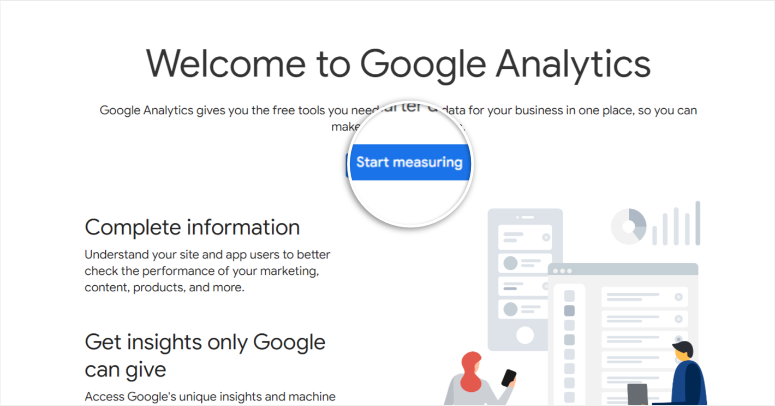
Next, sign in to Google Analytics with your Google account and find the Start Measuring button.
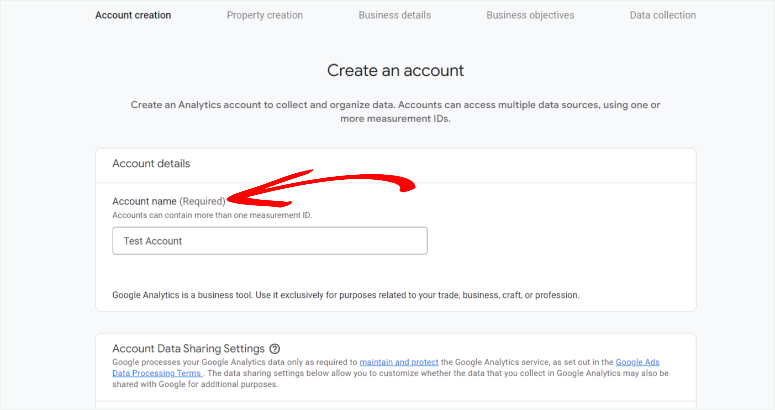
Next, create an Account Name for the site you want to track. Remember, you can create multiple accounts in GA-4, so use a name you can easily associate with the new property.
Remember, you can add multiple tracking IDs to the same Google Analytics account, allowing you to monitor all your properties in the same spot. This ensures everything is streamlined, reducing confusion and double work.
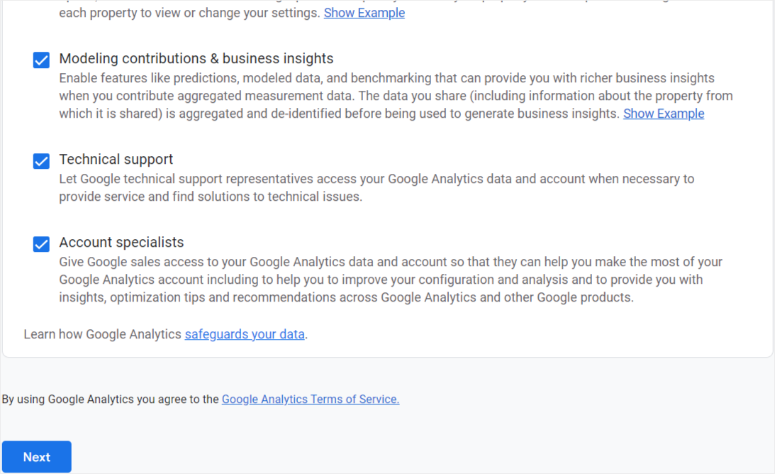
Then, on the pop-up window that will display, check the permissions you want to give Google Analytics and proceed with Next.
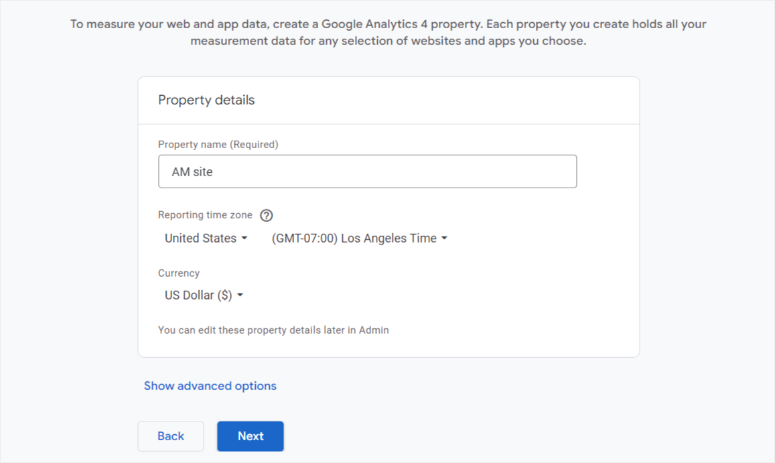
On the next screen, you will add Property Details.
A GA4 property can be a site or an app you want to track. So, enter the property name, reporting time zone, and currency, and proceed to the Next page.
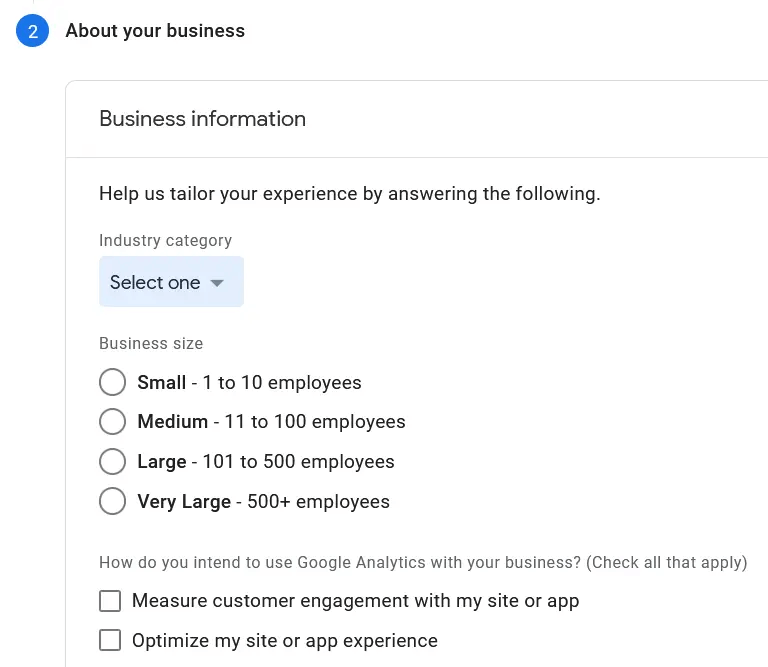
The next step is to provide details about your business. On this page, you will add your industry, category, and business size.
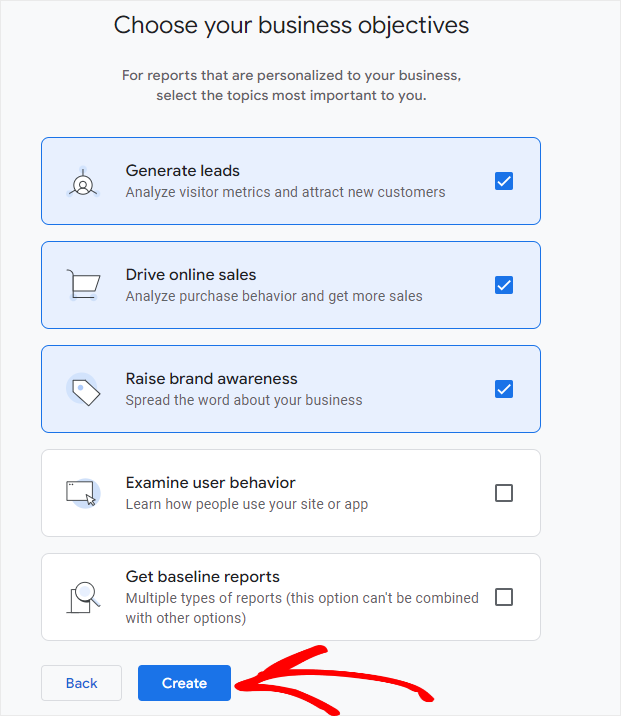
Then, on the next window, tell Google Analytics how you intend to use the platform. Check the objectives boxes applicable to you and proceed with Create.
After this, a new popup will appear, where you can review the information and check the terms and conditions box before hitting the ‘I Accept’ button.
With the property details filled out, it is time to create a Data Stream for your property. Since the property we want to track is a WordPress website, we will go with “Web.”
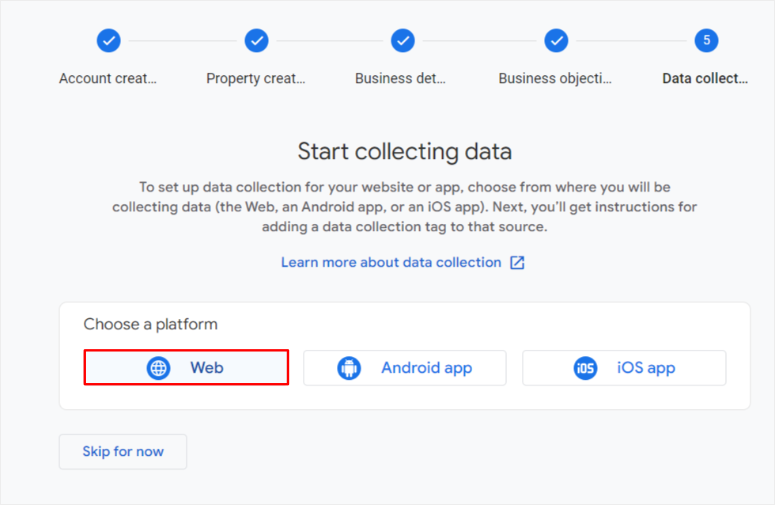
Once you create stream, add the site’s name and URL. Then, enable Enhanced Measurements to automatically monitor content elements and interactions.
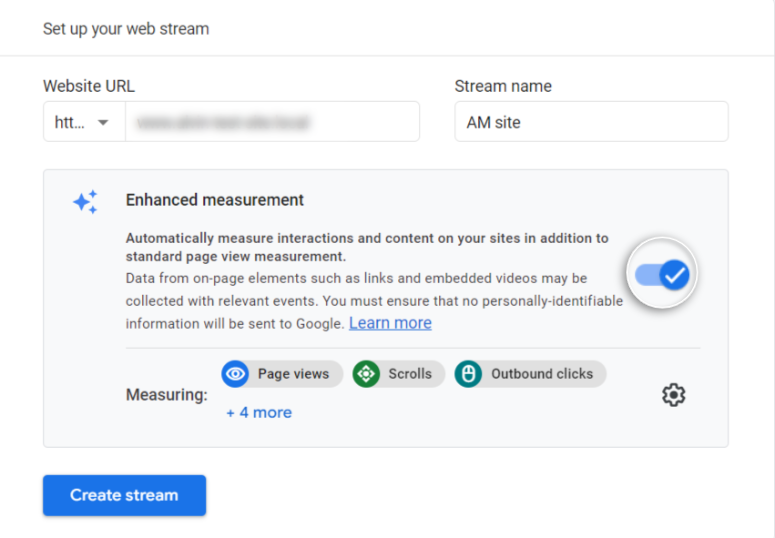
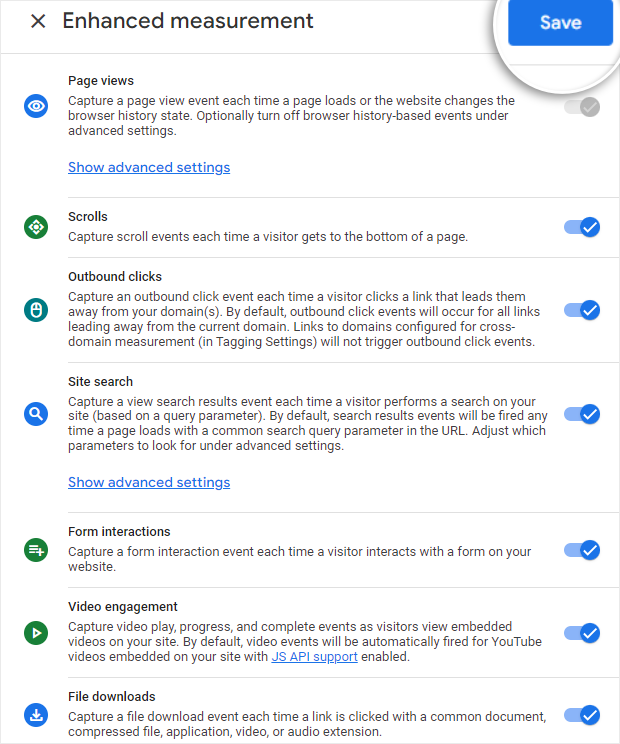
In the settings tab on the far left, use a toggle button to set up the metrics you want to measure automatically. Then, select Create to proceed to the next page.
At this point, you should have entirely created a property. You will receive a unique tracking code to add to your website.
If you want to add GA4 manually, you will need to copy this code and add it to your WordPress site.
Just to cover all the bases, to find your tracking code in the future, simply go to Admin » Property » Data Streams.
Then, select the data stream you want. You should see the Measurement ID at the far right after the Stream Name, Stream URL, and Stream ID.

With that, you have successfully created a Google Analytics property and its tracking code.
Step 2: Set Up MonsterInsights
With everything set in the Google Analytics dashboard, head over to your WordPress dashboard to set up MonsterInsights.
Here, go to Plugins » Add New Plugin. Then, in your plugin repository, search for “MonsterInsights,” install the plugin, and activate it like you would any other plugin.
If you face any issues, check out our WordPress tutorial on how to install a plugin.
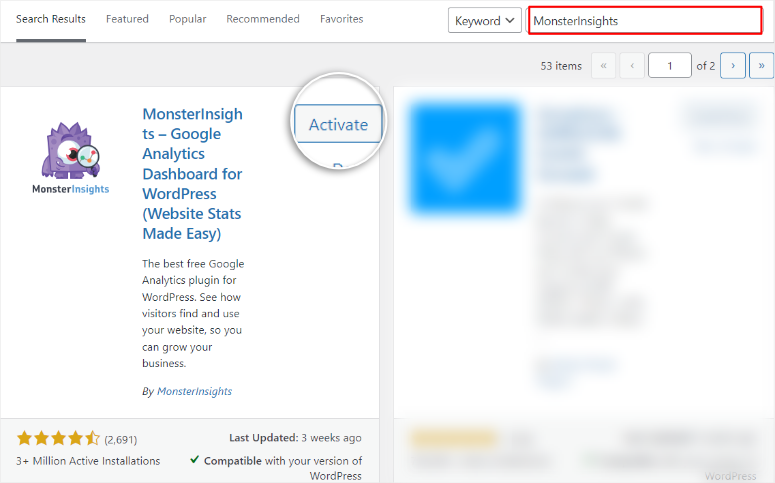
Even though the free version of MonsterInsights helps you add Google Analytics to your WordPress dashboard, you should consider getting MonsterInsights Pro from the plugin’s official site for advanced features.
MonsterInsights Pro can be particularly useful for eCommerce, offering advanced metric measuring tools such as headline analyzers and coupon reports.
Here are other useful features you can expect from the premium version of MonsterInsights.
- Form Conversion Tracking: Track how well your contact forms, opt-in forms, and other website forms are converting visitors into leads.
- Custom Dimensions Reports: Create custom reports to track specific metrics that are important to your business.
- Real-Time Reports: Gain immediate insights into website traffic and user behavior as it happens.
- User Journey Report: Visualize how users navigate your website and identify areas for improvement.
- Affiliate Link Tracking: Track clicks on your affiliate links to measure their effectiveness.
- Video Tracking: Gain insights into how visitors engage with your videos, including playtime and completion rates.
Step 3: Connect MonsterInsights to Google Analytics
Once the plugin is installed and activated successfully, MonsterInsights will automatically direct you to launch the Setup Wizard.
The setup assistant offers a simple line progress bar to help you follow these simple steps, ensuring even beginners have an easy time.

Alternatively, you can access the setup wizard by going to the Insights menu in your WordPress dashboard. Then, go to Settings and proceed to the ‘General’ tab.
Finally, scroll until you find the Launch Setup Wizard button on the page.

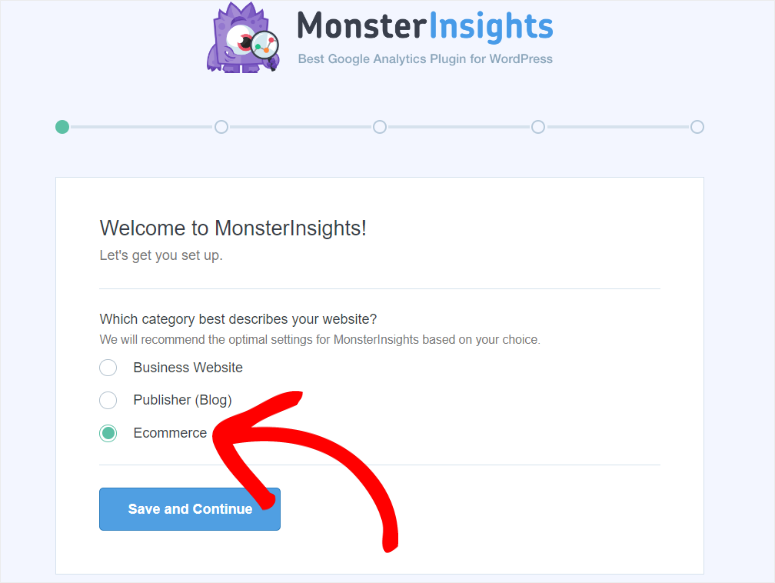
Now, on the first page of the setup wizard, select your website category and select “Save and Continue.”
Make sure the category reflects what you do on your site to ensure MonsterInsights adds the relevant tracking features for you.
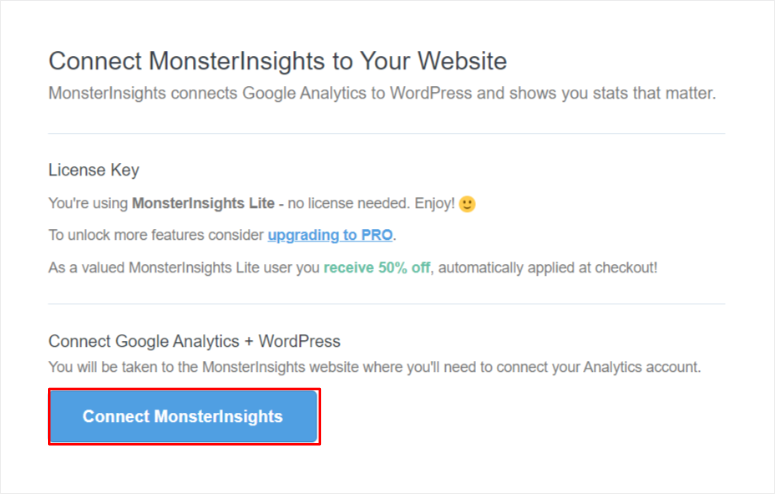
Then, on the next screen, hit the Connect MonsterInsights button and let it authenticate.
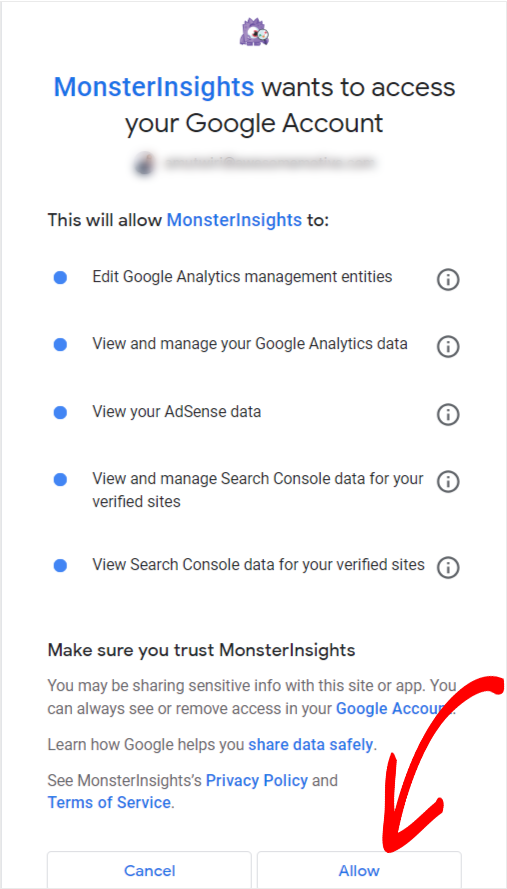
Next, add the Google account you signed up for with Google Analytics and then grant MonsterInsights permissions.
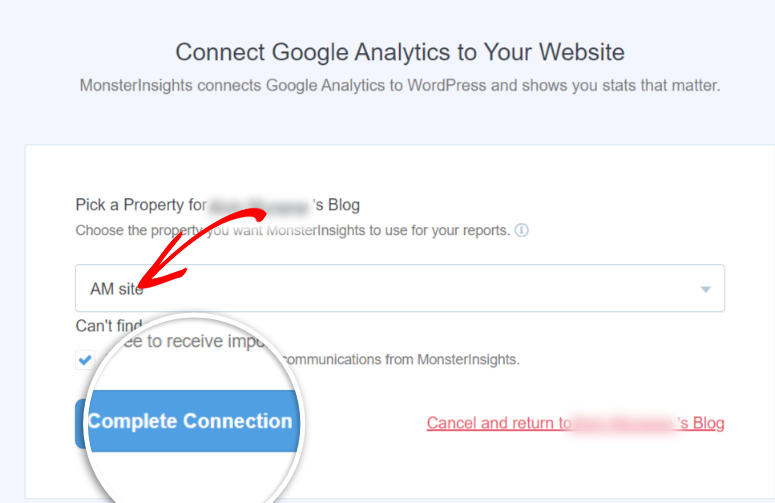
Then, select Complete Connection after picking the property you want to connect from the dropdown menu.
Next, fill out all the required information on the ‘Recommended Setting’ screen, then Save and Continue.
After the plugin completes the setup process, it will redirect you to the Insights WordPress menu.
Here, select the Reports submenu to view your site insights. The dashboard uses a tab system to help with easy comparison of different metrics.
The metric reports are structured systematically and include the following:
- Overview
- Traffic
- Publishers
- Search Console
- eCommerce
- Dimensions
- Forms
- Realtime
- Site Speed
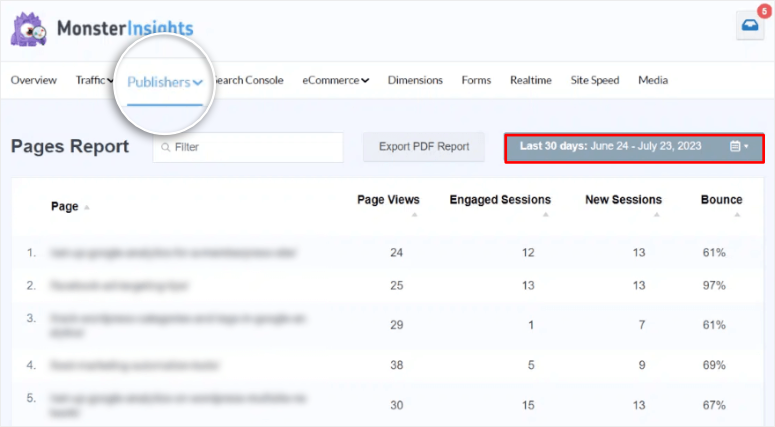
For example, on the Publishers tab, you can check default metrics like page views, bounce rate, engaged sessions, and new sessions. You can customize this report to show an exact time period to identify moments of traffic surges or drops.
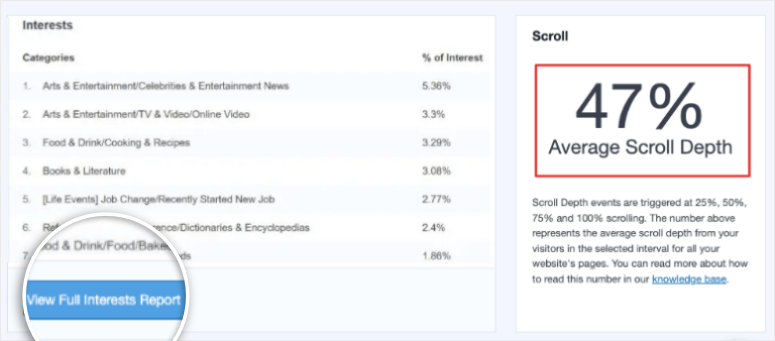
Further down the page, you can also see more specific data, including “Interests” and “Average Scroll Depth.”
Now, the reports you get on MonsterInsights are usually simplified.
To get the full report, select View Full Interests report to open the data in your Google Analytics dashboard.
But that is not all you can do with MonsterInsights. Let’s go through the various ways, features, and settings you can use this plugin.
Step 4: Customize insights with MonsterInsights
Site owners, niches, and industries have different priorities when it comes to reports and metrics. By personalizing your data and making custom reports with MonsterInsights, you can always measure the most relevant metrics to you with ease.
This makes aligning your goals with your data easier, leading to better decision-making and forecasting.
MonsterInsights makes it easy to create such custom reports.
Plus, all these settings can be placed through the setup wizard during the initial configuration.
But to do it manually, go to the Insights menu on WordPress and visit the Settings submenu. Then, scroll to find Launch Setup Wizard and select it.
Here you can set up the following configurations:
- Affiliate link tracking: Even though most affiliate links come with tracking capabilities from the affiliate partner, using MonsterInsights gives you access to your own data. This way, you do not rely on what the report from the affiliate says. You can also compare the report from MonsterInsights and the affiliate easily.
- Access control: This feature is especially great if you have a big team. You can easily control who sees your insights by granting specific access to individuals.
- Automatic Plugin Updates: MonsterInsights carries out updates often to incorporate new features and improve the plugin. Set up automatic plugin updates to ensure you never miss anything.
- Enhanced Link Attribution: This feature offers the best way of seeing how users interacted with your links. Identify which links are most clicked on, such as the image, anchor, or title links. Enhanced Link Attribution offers a great way to track event links as well.
- 20+ Advanced Tracking: MonsterInsights offers easy-to-use but advanced tracking capabilities such as form tracking, scroll tracking, author tracking, file download tracking, category and tag tracking, and logged-in user tracking.
- All in One SEO Toolkit integration: All in One SEO is the best WordPress SEO plugin. Its integration with MonsterInsights gives you the best search engine insight, such as keyword tracking, on-page SEO insights, and an SEO score.
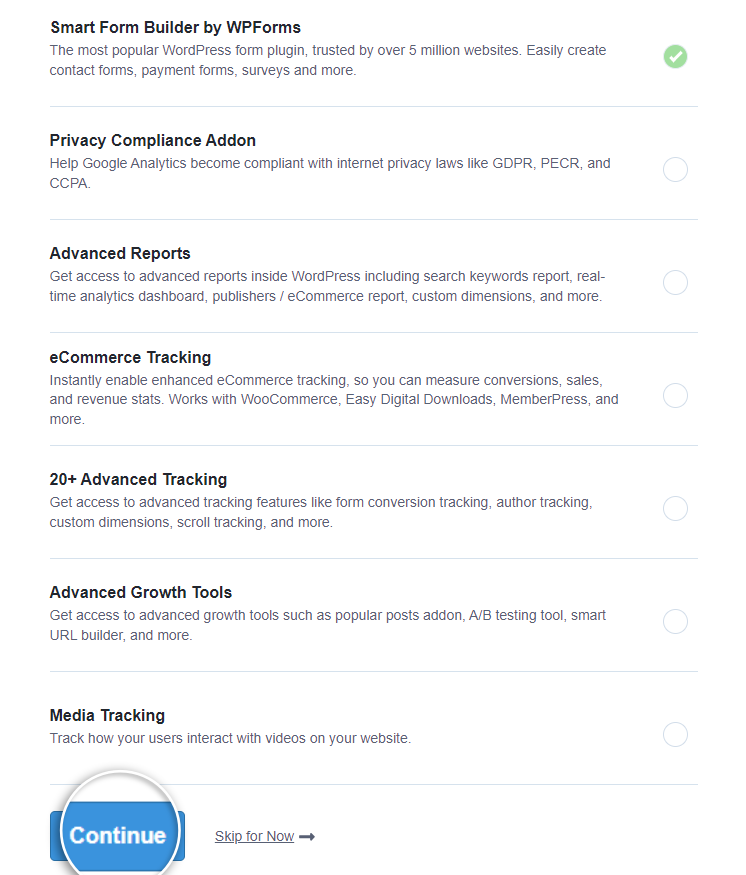
- eCommerce Tracking: You can track revenue, sales, product performance, shopping cart abandonment, track referral sources, conversion rate, and more.
- Advanced Growth Tools: MonsterInsights has several advanced growth tools you can use. Create Custom URLs with set parameters to specifically track the effectiveness of your marketing efforts. The Popular Posts addon highlights your most popular content by creating a list and prominently featuring these top-performing blog posts on your site. Another great feature is A/B testing. It involves comparing two web page versions to determine which performs better in terms of user engagement or conversion rates.
- Privacy Compliance Addon: This ensures Google Analytics is compliant with GDPR and CCPA.
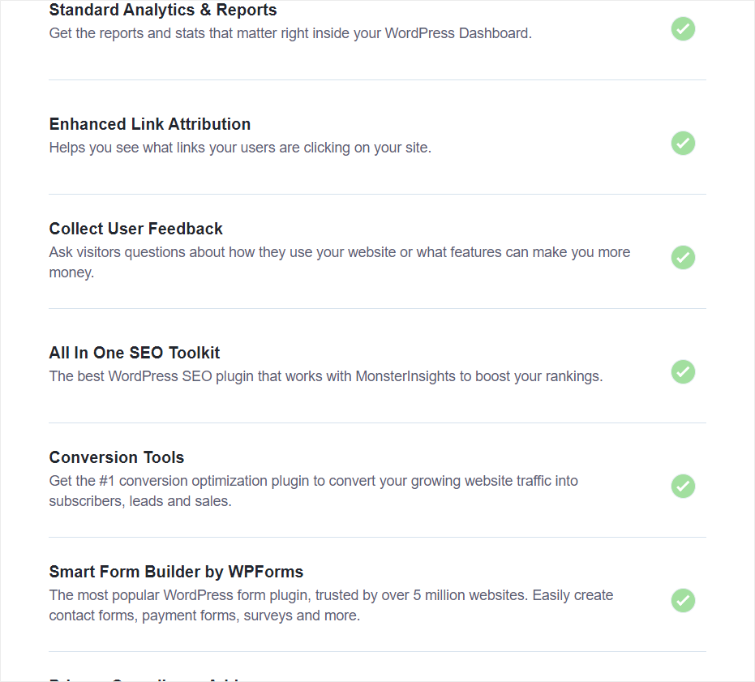
While these features may seem complicated because of the advanced functionality and customization they offer, MonsterInsights makes it incredibly easy to set up. All you have to do is check the box next to the advanced feature and hit Continue when done.
That’s it! You have successfully added Google Analytics to your WordPress dashboard. Now, you can get in-depth insights in a simpler, personalized way without ever leaving your WordPress dashboard.
Adding Google Analytics Through WPCode

WPCode is designed to simplify and manage custom code snippets, reducing reliance on plugins and inevitably reducing site bloating.
It is an incredibly handy tool for coders and beginners alike. You can set up Header and Footer snippets to integrate tracking codes like Google Analytics and Facebook Pixel, advertising codes such as AdSense, and more.
On top of this, WPCode lets you insert code snippets written in various programming languages like PHP, JavaScript, CSS, and HTML. This enables you to carry out a wide range of customizations, such as adding custom functionality, modifying website appearance, or integrating other third-party services.
With WPCode, you can also use Conditional logic.
This allows you to control where and when your code snippets are displayed. For example, you can display a specific code snippet only on certain pages, posts, or for users logged into the website.
As you can see, WPCode can help you with coding, even if you do not have developer experience.
So how can this snippet plugin help you set up GA-4?
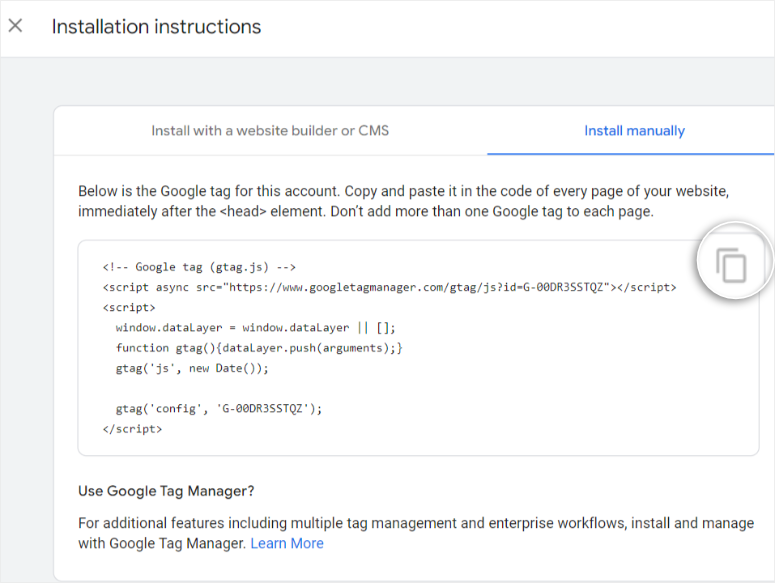
First, go to your Google Analytics dashboard and select Go To Data Streams. Then, select the data stream you want and hit View Tag Instructions.
Here, copy the code under the Install Manually tab.
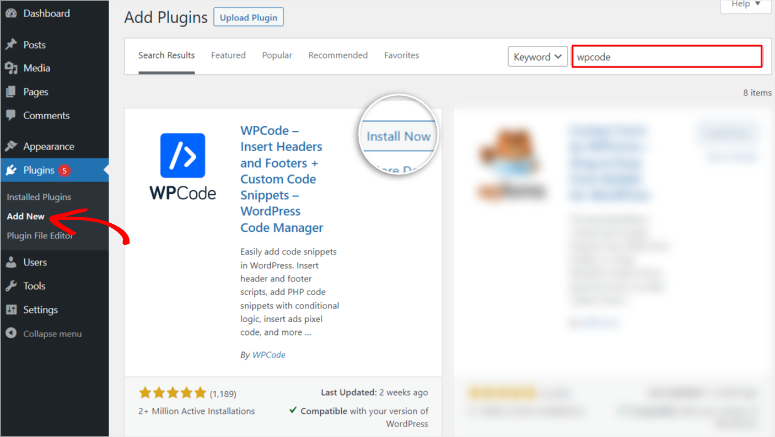
Now, back on your WordPress dashboard, install and activate the WPCode plugin through the plugin repository.
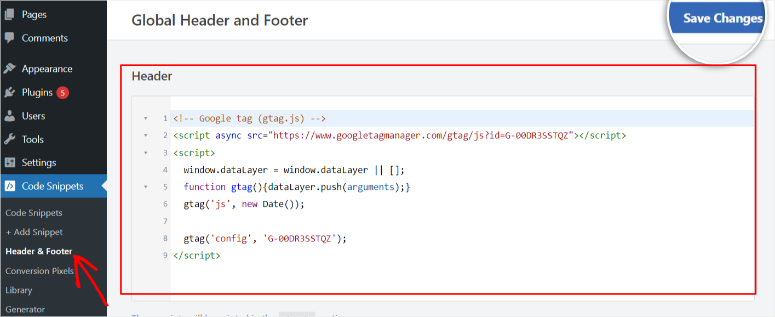
After WPCode is activated, go to Code Snippets » Headers & Footers in your WordPress dashboard.
Then, paste the tracking code you copied earlier from your Google Analytics 4 account in the Header section of this page.
Make sure you hit the Save Changes button after adding your Google Tracking code.
That’s it! You can now connect Google Analytics to WordPress manually with a plugin.
You can only view your data in your Google Analytics dashboard and not in WordPress as you would with MonsterInsights.
Now, as mentioned, WPCode allows you to add complex code manually without touching the code. It helps you add the code snippets in the same location as you would using the manual process but without all the risk.
But you can also set up GA4 with WordPress manually without any Google Analytics plugins.
Adding Google Analytics to Your WordPress Theme
It is possible to add the Google Analytics tracking code to the site’s theme’s header or footer without a plugin’s help.
But, we do not recommend this method.
This is because the smallest misstep can cause your entire site to crash or malfunction. You will need to update the code if you change the theme or make any major changes to your site which can cause security risks as well.
Plus, you also need to debug tracking issues and constantly check site performance, which makes scaling difficult.
With these disclaimers out of the way, there are 3 ways to add the Google Analytics tracking code to your theme.
- Add tracking code through the Header.php file
- Add tracking code through the Footer.php file
- Add tracking code through the Functions.php file
Add Code Through The Header.PHP File
You will need to access your files through your cPanel or FTP client portal. For this example, we will use the Bluehost cPanel.
Once you log in to your cPanel, go to “File Manager” under the Files tab and navigate to the public_html root folder.
In this folder, go to wp-content » themes. Then, locate the active theme you are using on your site and select it. Finally, find the header.php file within this file and right-click to Edit.
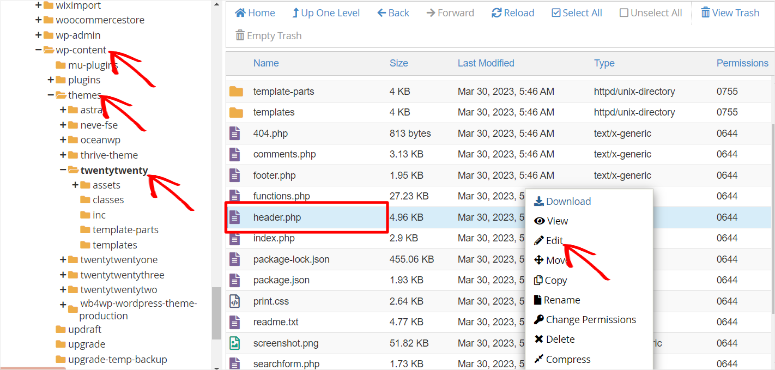
In the code editor, find the code line located near the top. Paste the Google Analytics tracking code right before the closing tag. Then, Save the edit.
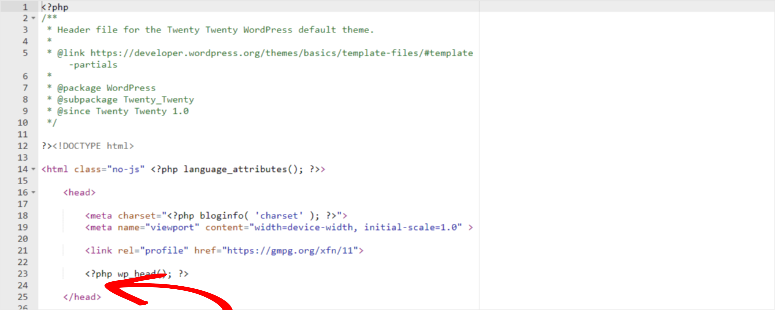
Great! You have just added the Google Analytics tracking code manually on your WordPress theme through the header.php file.
Add Tracking Code Through The Footer.PHP File
Adding the tracking code to the footer is almost identical to adding it to the header. The only difference is that you will add it to the footer.php file, not the header.php file.
To get started, use your cPanel or an FTP client portal and locate the public_html root folder like in the previous process.
Follow the same process you did while inserting the code to the header.php file, but this time, find the footer.php file.
Finally, insert your Google Analytics tracking code just before the closing tag in the footer.php file.
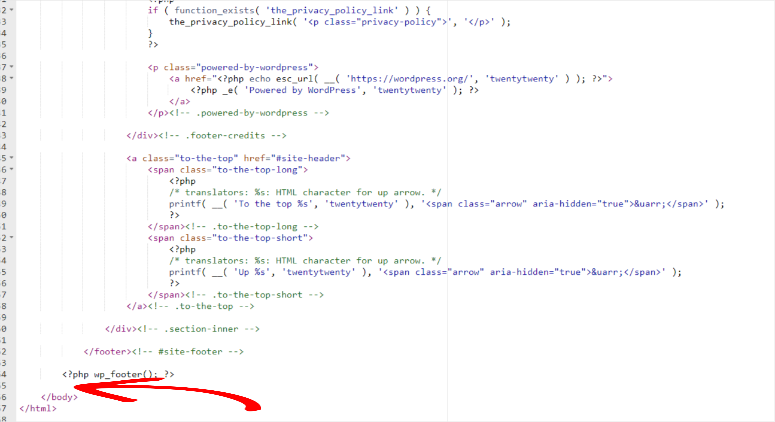
Add that’s it! You can now successfully add the tracking code to your theme’s footer through cPanel or an FTP client.
Add Tracking Code Through The Functions.PHP File
Out of the 3 manual processes we have listed here, adding a tracking code to the fucntions.php file is the riskiest because it often causes plugin conflict. So make sure that you do not make any errors if you go with this process.
So, for this method, we will use the WordPress dashboard. Here, go to Appearance »Theme Editor.
You will see a list of files on the right under Theme Files; locate the ‘functions.php’ file.
Scroll to the bottom of this page, and just before the closing tag, paste this code:
1 <?php2 add_action('wp_footer', 'add_Googleanalytics');3 function add_Googleanalytics() { ?>4 // Paste your Google Analytics code here5 <?php }6 ?>Then, in Line 4, paste the actual tracking code from your Google Analytics 4 dashboard.
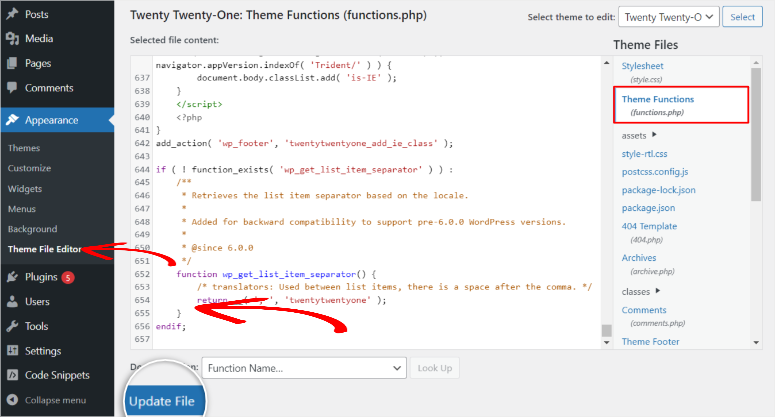
Next, hit the Update File button, and you should have added your Google Analytics tracking code.
Remember that adding the tracking code manually without a plugin or through WPCode may take some time before metrics start trickling into your Google Analytics dashboard.
Congratulations! You can now use Google Analytics to monitor your WordPress website performance.
Should I Switch to Google Analytics 4?
Yes. Google retired Universal Analytics, so you have to use Google Analytics 4. So, if you were using Universal Analytics, you’ve likely seen this warning in your dashboard:
“Universal Analytics will no longer process new data in standard properties beginning July 1, 2023. Prepare now by setting up and switching over to a Google Analytics 4 property.”
Suffice the fact that the date displayed has long passed, you can still see the message in your UA account.

Google made it clear that UA will no longer fetch new data from July 1, 2023. They stated that users would be able to see your Universal Analytics reports for a period of time after that. But all new data will only flow into Google Analytics 4 properties.
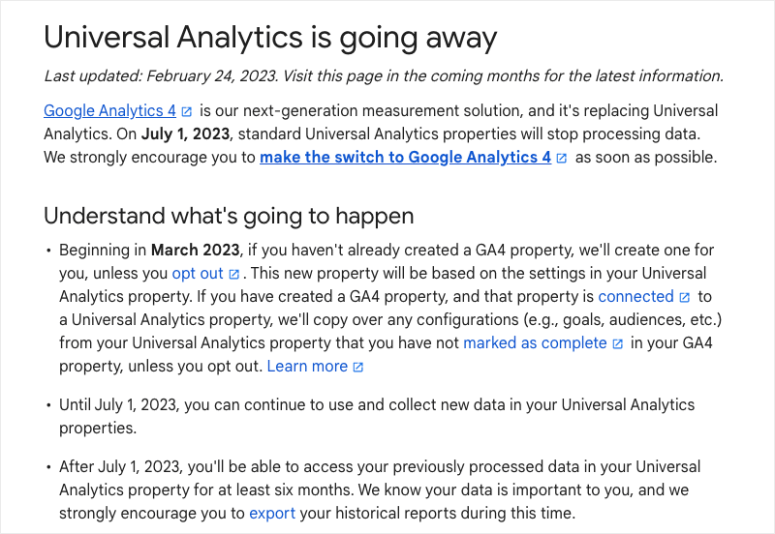
To add to that, you also can’t transfer historical data from Universal Analytics to GA4. If you have any more question we have not answered in the article above, check out our FAQs below.
FAQs: How to Set Up Google Analytics in WordPress
Is Google Analytics free?
Yes, Google Analytics is free for anyone to use. In fact, you can sign up with your Gmail account already signed into your PC with ease.
Is using Google Analytics through a WordPress plugin safe?
Yes, using Google Analytics through a trusted WordPress plugin like MonsterInsights is safe and recommended. MonsterInsights upholds the security of your website analytics data by adhering to best practices:
- Data Privacy: MonsterInsights is compliant with privacy regulations like GDPR and provides options to anonymize IP addresses, ensuring user data protection.
- Secure Integration: It uses secure OAuth authentication to connect with your Google Analytics account, keeping your data safe from unauthorized access.
- Regular Updates: The plugin is regularly updated to patch security vulnerabilities and maintain compatibility with the latest WordPress versions.
Is Google Analytics 4 replacing Universal Analytics?
Google Analytics 4 (GA-4) is not a replacement for Universal Analytics per se, but the newest version. GA4 offers advanced features and a more user-centric approach to tracking data. Learn more here: Google Analytics 4 vs Universal Analytics: Full Comparison.
Do I have to own the domain to set up Google Analytics?
Yes, you need admin access to your domain or website in order to connect your website to Google Analytics.
How do I use Google Analytics and MonsterInsights for SEO?
Combining Google Analytics and MonsterInsights can supercharge your SEO efforts:
- Keyword Tracking: Use MonsterInsights to track which keywords bring the most traffic to your site. Optimize your content around these keywords for better SEO.
- Page Insights: Monitor individual page performance in Google Analytics and identify high-performing pages. MonsterInsights provides easy-to-understand reports, helping you improve underperforming content.
- User Behavior: Analyze user behavior with Google Analytics through MonsterInsights to get insights on user engagement, click-through rates, and more.
How do I export data from Google Analytics to my WordPress site?
To export data from Google Analytics, you can use the export feature in your Google Analytics dashboard. However, a better and simpler way is to integrate it with your WordPress website using MonsterInsights. This method will remove the need to export data since all of it will be readily available in your WordPress dashboard. To set up MonsterInsight:
- Install and activate the MonsterInsights plugin on your WordPress website.
- Connect MonsterInsights to your Google Analytics account. This can be done through the plugin settings by following the guided setup.
- Once connected, MonsterInsights will automatically start tracking your website data, such as page views, user demographics, and more.
- Access your data in an easy-to-read format directly from your WordPress dashboard.
Is MonsterInsights the only way to set up Google Analytics 4?
No, you can set up Google Analytics manually. This involves inserting a tracking code into your website’s coding in the header.php file. MonsterInsights is easier and requires no coding. All website owners can use this plugin including beginners.
Is there a Google Analytics 4 course?
Yes, Google has free online courses on everything related to Google Analytics, including GA4. The course includes Google Analytics 4 tutorials to help you navigate the platform and learn how to use it.
Can I get a Google Analytics 4 certification?
Yes, there are plenty of online options to get certified in Google Analytics 4, including Google Analytics Academy, Skillshare, Udemy, and LinkedIn.
If you would like to try other tracking tools other than Google Analytics, here are 13 Tools to Track Visitor Traffic on Your WordPress Site. To add to that, here are additional articles you can read to help you learn more about tracking.
- How to Set Up WordPress Conversion Tracking (Step by Step)
- How to Set Up WordPress Form Tracking in Google Analytics
- How to Track and Monitor User Activity in WordPress
These 3 articles offer an in-depth look at how to track specific site metrics and how you can fully use the information to improve your site.
The post How to Set Up Google Analytics 4 in WordPress (2024) first appeared on IsItWP – Free WordPress Theme Detector.


